Friday, July 28, 2017

How much power do you give the word "NO" when going after what sets your soul on fire?

NO!
It's alright to reach for what you want!

The word "no" is something everyone has heard. It probably was one of the first words you learned as a child when you would reach for something you should not, and your mom or dad would immediately stop you with a loud "no". As a child, you may have attached a very negative meaning with the word "no". Now let's fast forward to adulthood. If "no" still has a negative connotation for you then it is time to change the story. 

When you were a child reaching for something, you probably heard the word "no" if you were reaching for something hot, sharp, or something that you could potentially damage. As an adult, the things we are reaching for are new jobs, promotions at a current job, or maybe even when applying to attend college. Take a moment and think back to being told "no" to one of the things I have listed. How did it make you feel to receive a letter or an email telling you that you were not accepted to a specific college, or that you did not get a job you thought you really wanted when you applied? Many people take these rejections personally and give up trying to reach for what they want, but I want to talk to you about shifting the way we look at things. After all, perspective is reality.

So how much power do you give the word "no"? After graduating from college I would apply for different types of jobs. I would interview and get so excited about the new possibility of getting the job, only to receive the letter telling me "no" we have decided to go with another candidate. I would find myself immediately getting a little down when I received it, but for some reason I kept the letters. When I moved out of my parent's house, like all good children I left things behind. My mother, who is over the top organized (I did not get that gene) called me one day while she was cleaning out my stuff. In a very frustrated voice she says to me "why in the world are you keeping these rejection letters from jobs you have applied for?" I immediately responded with "so I can be reminded of what companies really missed out by not hiring me." My mother immediately began laughing and said "well that sounds good to me, I wish I had your confidence." I am not really sure if it was confidence, or if that was the beginning of me creating a different meaning for the word "no".

My point is this, do not let the word "no" stop you from reaching for your dreams or trying something new. The word "no" is just that; it is a word. If you hear the word "no", look at it as an opportunity to try again, or to get better. Maybe you could even think about it from the perspective of this is not where the universe wants you to be at that moment, and then be OK with that.

Your mind is what gives the word meaning. Just once, allow yourself to branch out and try something new, or go for something out of your comfort zone. If you end up hearing the word "no" then just say to yourself "this is not where the universe wants me right now" and move forward. In life we can't be scared to reach for things. Do not give a two letter word the power to stop you from achieving your dreams. Remember, your perspective creates your reality so reach, dream, and go for it! Having faith and knowing that you will land exactly where the universe wants you is a step in the direction of inner peace.


Sunday, June 26, 2016

4th of July Cookouts and Staying Healthy!

Healthy Salad for those not so healthy cookouts!

So the 4th of July is upon us, and that means you will probably be invited to some cookouts with friends!  This is great, but it can also be detrimental to your diet if you are not careful and prepared! So if you are the host of the cookout or an invited guest bringing a side, this is one recipe that packs plenty of vegetables and color to leave you feeling satisfied and it's quick and easy!

First, choose a vinegar option that you like.  That can be red wine vinegar, white wine vinegar or apple cider vinegar.  For the pictures that follow I used white wine vinegar, but I also love all of the other options.  If you want a stronger taste go with red wine vinegar or apple cider vinegar.  Take a large to-go container and add in 1/4 cup of the vinegar of your choice.  Then add in 1/4 cup of Extra Virgin Olive Oil.  I also added in 4 tablespoons of honey because I wanted that sweet and sour taste. If you are not a fan of the sweet and sour taste just eliminate the honey!  Add in a teaspoon of salt and some fresh ground pepper to taste.  Then use a whisk to combine.  Mine looked like the picture you see below.


Now it is time to add some bright color to your mix!  I first began with zucchini and my Veggetti! Yes it sounds inappropriate, but it has become my go to kitchen utensil. I got mine off Amazon, but you can check them out here.
1.  Use the Veggetti to create zucchini noodles (I used two small zucchini for this salad)
2.  Cut up some baby carrots, about a half of a bag (Mine were cut length wise but you can do yours however you like.)
3.  Dice up 1/2 of a red onion
4.  Dice up two Roma tomatoes (You can also use grape tomatoes and cut in half if you like.)
5.  Cut up one head of broccoli florets


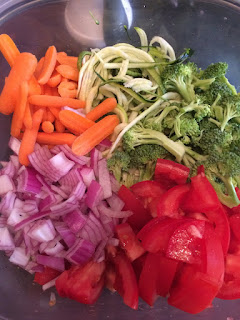
After all vegetables are prepped, place into your oil and vinegar mix and toss. It will look beautiful and colorful like the picture you see below.

Refrigerate for a few hours or over night is even better!

I also enjoy topping mine with a few tablespoons of Feta cheese to really pack that sweet and sour punch!

Take this to your next 4th of July Party and have this on the side of your chicken breast or burger.  I think you will feel much better eating this than loading up on chips and did or perhaps fries!  Your body will thank you too!

Sunday, December 20, 2015

Tis' The Season!

Tis' The Season!

Well we have reached the week of Christmas, and if you are anything like me you may have some last minute shopping to do!  Or maybe, just maybe you want to buy yourself a little gift for the holidays!  Maybe some new athletic gear for your Yoga or Pilates class perhaps? With that being said, I will make this blog short and sweet. Here are few sites that have some great Yoga/Pilates gear and here are some coupon codes and holiday deals to make your online shopping experience that much sweeter of a deal!

First company, MANDUKA
If you are in need of a yoga mat that will last through pretty much anything, this is the store for you! Manduka's mats are made to last, they are heavy and durable. Designed to last so they are a bit more expensive, but take it from me I have had my same mat for about 7 years now and I have not worn a hole in it yet! Plus they have yoga blocks, straps and bags if you are in need of any of those items!

Manduka Coupon:
Right now save $25 towards your next purchase of $100 or more!  Use the code HOLIDAY25 now through 12/31/2015!

Second company, ATHLETA!
Athleta does have some expensive workout gear, but it's high quality stuff and they stand behind their product!  If you don't like it, send it back for a full refund!  They are an awesome company!  Not much time with this coupon though!

Athleta Coupon:
Save 20% on your order by 12/21/15! Coupon Code:  wrapup  And as long as you order $50 or more, your shipping is FREE!

Third company, YOGA JOURNAL!
Do you enjoy picking up a copy of Yoga Journal from time to time, but hate paying $5 for every issue? Well why not just have it shipped directly to your house for your reading pleasure?

Yoga Journal Coupon:
Access this link to get yourself signed up for 9 issues of Yoga Journal for the low price of $9.97! Just FYI, there are other magazines on this link as well so you may see some other magazines for a gift for someone else! Offer expires 12/25/2015!

Fourth company, LULULEMON!
Lululemon does have some expensive stuff, but I have always loved their stuff.  There is no coupon code for this, it's automatic at the checkout.

Lululemon Deal:
Order by December 22nd and get it by December 24th!  FREE SHIPPING on all orders, but you must order by December 22nd at 11:59 PM!

Fifth Company, PRANA!
Prana not only has cute things to hit the studio with, but they also have cute everyday clothing as well!

Prana Deal:
Free 2 day shipping on ALL ORDERS if you order by December 21st!

I wanted to make this blog a quick one stop shop for some of your athletic gear needs. Yes some of these stores can be pricey, but many times I go ahead and purchase stuff for the summer while it's on sale so I am ready to go when it gets warm outside! So definitely check out the sale section of each website! Merry Christmas, and Happy Holidays to you and yours!


Friday, July 3, 2015

Energy Bars

The following recipe was taken from Les Mills and then edited a little to create what I believe is one of the best on the go snacks!  We all have those times during the day when our blood sugar drops, and we are looking for something to "snack" on.  Many times, at work if we have not prepared properly the only option we have is something unhealthy.  The following recipe takes about 30 minutes of prep time and then about 20 minutes to cook, but once it is created you have a batch of healthy snacks for about a week.  There is no refined sugar and they are gluten free.  This snack is perfect for that time before or after lunch where you just need a little something to keep you going until you can have your next healthy meal. I have made these every week for the last month and my husband has even started to take them to work.  I will give you the recipe below, and I will also give you some options about how you can change a few things to make your bars exactly the way you would like!

Ingredients:
1/2 cup slivered almonds
1/2 cup pecans
1/2 cup walnuts
1/2 cup of unsweetened shredded coconut (divided)
1/4 cup of almond butter (or really any type of nut butter that you like)
1/4 cup of coconut oil
1/4 cup of almond flour
1 1/2 tsp of vanilla extract
2 tbsp of raw honey
1/2 cup whey protein (vanilla or chocolate flavor, Nirto Pro is a good option!)
1 large egg plus 2 tbsp of egg white
1/2 tsp of sea salt
1/2 cup dried blueberries, or cranberries, or dark chocolate chips (or all of them!)
8x8 pyrex baking dish
Parchment paper

First step is to preheat the oven to 325 and toast the nuts.  I use a baking pan and spread the almonds, pecans, walnuts, and 1/4 cup of the coconut out onto the pan.  Place them in the oven for about 10 minutes.  I wait until the white coconut begins to brown and then I remove.  Make sure you also shake the pan of nuts about half way through the cooking process. Remove the nuts and allow to cool for a few minutes.
 While the nuts are toasting and cooling I begin the next process of mixing the almond butter and the coconut oil.  Place it into a microwave safe container and heat for about 15 to 20 seconds in order to get it warm.  If you are planning to add dark chocolate, this will ensure the chocolate melts into the mixture.

While warm, mix in the dark chocolate chips.

Once mixed up it will look like what you see below.  Now go ahead and add in the vanilla, honey, and sea salt.


Sit the mixture above to the side and head back to your toasted nuts.  Place the nuts into a food processor and pulse until you get a nice rough chop.


Then take the nut mixture and fold it into your almond butter mixture.


Now add in your almond flour and your protein powder.  I have used both the Les Mills Vanilla and the Nitro Pro Chocolate from Win Win Nutrition on my last blog.  It depends on the level of chocolate flavor that you like.


As you can see the mixture begins to look crumbly.  The next step will add he moisture.


Now, add in your whole egg and two tbsp of egg white.  This is another place I changed the recipe. When I first created this, the mixture was very crumbly and when I made the bars it was very hard to cut them out without them falling apart.  When I added the egg white it made it have more of a soft brownie consistency and held the bar formation much better.  I have also played with the amount of egg white and 2 tbsp seems to be perfect!


Now you can fold in those blueberries or cranberries as you can see below.


Next you are going to need your 8x8 pyrex dish.  Another thing I found was how difficult it was to get the mixture to keep from breaking as I got the first few bars out, so I added the parchment paper. It makes removal of the bars so much easier and a lot less messy.  Line your 8x8 baking dish with parchment paper and press the mixture into the pan.  You are going to bake them on 325 for about 20 minutes, sprinkle the remaining coconut onto the top for the last 5 minutes of baking.  The reason I don't put the coconut on immediately is because I don't want it to burn.  After 20 minutes, just remove from the oven and sit the pan out to cool and set up for another 20 minutes.

After the 20 minutes I removed the mixture by picking up the edges of the parchment paper and placed it on a cutting board.  I allowed it to sit there for probably another 10 minutes just to be on the safe side.


I first began by cutting the bars into large fourths.


Then I cut each fourth into 3 bars.  So by the time you are finished you should have 12 servings! Place them in an air tight container, take one as a snack or have as a quick breakfast when you don't have time!  They are very filling and very satisfying!

Based on my calculations of adding both chocolate AND blueberries these bars are about 262 calories!  They have 12 grams of carbs, 8 grams of protein.  They are perfect for a healthy snack and all natural.

Some of the things I have found helpful:

1.  I purchase large bags of nuts in bulk from Costco.  It's an expensive trip the first time, but you can make many batches with the amount you get.  Plus it's just cheaper than the grocery store prices of the small bags.

2.  I added the egg white to hold the mixture together better.  If you prefer a bar that is more crumbly then feel free to eliminate the egg white.  I just prefer mine to hold together.

3.  I also changed the amount of honey from the original recipe to 2 tbsp because I was trying to keep my mixture together and the amount that was used did not stick the bars together well.  Feel free to experiment.

4.  In one of my previous recipes I used some Maranatha Dark Chocolate almond spread.  Instead of chips the last time I created this, I added in about 1/8 of a cup of this spread to the almond butter mixture and they still turned out great so feel free to experiment.

5.  If you really like chocolate, feel free to add about 1 TBSP of cocoa to your mixture as well.

6.  Remember, if you are local to the Buford, GA area run by Win Win Nutrition to get your Nitro Protein.  Ask for Beverly and tell her you want Tia's top shelf!  http://www.wwnsupplements.com/


Enjoy and Happy Healthy Eating! Namaste!


Tuesday, June 23, 2015

Protein Chocolate Peanut Butter Brownie

This one goes out to my dessert lovers!  My husband is a brownie lover!  As a matter of fact, he might even consider himself a brownie connoisseur!  So if he enjoyed these, this recipe is definitely a keeper in my home!  I made a dark chocolate brownie recipe and tweaked it a bit! Then I was in the store and there on the shelf was the jar of yummy goodness that changed my life and this recipe! So back into the kitchen I went, and this is what I created!

Ingredients:
2 Scoops of Chocolate Protein Powder (about 3/4 cup) (I use Nitro Pro see below)
1/2 TSP baking soda
2 TBSP of Cocoa
1/2 TSP Salt
4 TBSP of Peanut Butter Chips (if you don't like Peanut Butter feel free to add dark chocolate chips)
1/2 Cup of Maranatha Dark Chocolate Almond Spread (This is what changed my life)
2 TBSP of Agave
2 TBSP of Honey
1/2 TSP Vanilla
1 Egg white or 3 TBSP of Liquid Egg Whites
1/2 Cup Almond Milk (I used Blue Diamond Unsweetened Vanilla 30 calorie)
And one 8X8 Pyrex dish and Pam non stick cooking spray.

Step 1:  Go ahead and preheat your oven to 350 and take out two mixing bowls.
Step 2:  In one mixing bowl combine your dry mixture of Protein Powder, Baking Soda, Cocoa, Salt and Peanut Butter Chips and stir to combine.
Step 3:  In your second mixing bowl (microwave safe) put in 1/2 Cup of the Dark Chocolate Almond Spread.  I put mine in the microwave for about 20 to 25 seconds to make sure it was soft.  I then mixed the Agave, Honey and Vanilla into the Chocolate Spread.
Step 4:  Scoop out your Almond spread mixture into the dry mixture bowl.  Stir your ingredients well, it will be very clumpy but don't worry about that just make sure everything is combined.
Step 5:  Add in your egg white and mix.  Then slowly add in the 1/2 Cup of Almond Milk until your mixture resembles a brownie mixture.
Step 6:  Spray your 8x8 Pyrex dish with Pam and then pour the Brownie Mixture into the pan.  Cook for about 25 minutes on 350.  Make sure you watch your mixture.  I have a gas oven so my Brownies cooked pretty quickly.  You could need an extra minute or two if you have electric.
Once your Brownies are done take them out and let them cool for about 10-15 minutes.  If you use the 8x8 pan I suggest, and your cut your brownies into 8 slices, each brownie contains:
157 calories, 12 grams of protein, 14 grams of sugar, and 18 grams of carbs.

The Protein I use is below.  If you are local to the Buford, GA area run over to Win Win Nutrition and Supplements and ask Beverly for Tia's Top Shelf Protein and she can point you in the right direction.  http://www.wwnsupplements.com/


Hit the organic section of your grocery store to find this jar of yummy goodness!


 Expect your Brownies to look like this....already half gone!  Enjoy!

Friday, June 19, 2015

Egg White Sweet Tooth Breakfast

So as most of you know I have been on a 21 day detox.  Well I have to say that making pancakes each morning for my daughter had me yearning for something sweet for breakfast!  You know, eggs and egg whites get so old after a while.  So I decided to try something and it actually turned out pretty good!  I wanted to share the recipe so you guys could enjoy.

Ingredients Needed:

1/4 cup Almond Flour
6 tablespoons of Egg Whites
1 teaspoon Vanilla
2 tablespoons of pure maple syrup (divided)
1/4 cup of blueberries
1/2 cup of sliced strawberries

Step 1:
Take a bowl and combine almond flour, egg whites, vanilla, and ONE tablespoon of the maple syrup. Take some nonstick cooking spray and spray in an 8-10 inch pan (I think mine was a 10 inch, if you go smaller yours will just be thicker).  Make sure the heat on the stove is set medium to low because you don't want it to burn. You can see what it looks like below as it cooks.


Step 2:
Watch the mixture as it cooks.  You want the mixture to begin to be slightly thick enough to flip, so make sure it it browning on the bottom but not burning.  I used the spatula and just pressed down on the edges as it cooked.  When you are sure the mixture is cooked and strong enough to be flipped then flip it over just like a pancake.

As you can see, mine tore just a bit near the center so you have to be careful.  Still good to eat though!

Step 3:  
Once you have browned it on both sides, slide it out onto a plate.  Top it with the blueberries and the strawberries and then drizzle the last tablespoon of maple syrup on top!


Now you have a yummy sweet treat breakfast that only has 391 calories, and 17 grams of protein! This probably should not be an every morning thing, but it does help when you want something sweet and you do not want to feel guilty about it!  Enjoy and let me know what you think!


Saturday, June 13, 2015

Yoga Tunes


When I began my yoga teacher training, I remember my teacher telling me, “Some people will like my yoga, and some people will like someone else’s yoga, and that’s okay”.  This quote really stuck with me as I began teaching and wanted to create my own path as a yoga teacher.

As a teacher, I sincerely believe it is important to take different types of yoga classes.  Even if it is not the same style in which I trained, I can still garner something from every teacher.  Each teacher has something unique and different to offer from the instructor’s consideration of different ability levels and basic encouragement and energy brought to the experience to the way the poses are connected to the music which is playing in the background.  The atmosphere created by the music sets the mood for every class. 

Alright yoga instructors; let’s stop chastising other yoga instructors for the style of music they wish to play in their class.  That’s just one element that makes each instructor unique and gives participants choices.  It is just like students in school having their favorite teacher because of the elements they bring to the classroom.  Exercising for some people is a struggle within itself, offering them choices gives them one less reason to find not to show up.

The other day, I was reading over some posts on a Facebook page for a yoga teacher who is very popular, and I could not help but notice the negativity that someone used in their comment toward this instructor.  The comment geared towards how sad it was that a popular pop song, (with words in it, God forbid), was playing during the yoga routine. 

One word popped into my head:  “Ahimsa”.  You know non-violence, even with words.  One participant may not like having current pop tunes playing while they take a yoga class, and that is okay.  Someone else may only enjoy having instrumental meditation type music playing while they take a yoga class and that is okay.  Guess what, instructors can teach their class however they want and participants can visit and take classes from any type of studio that appeals to them.  You know why? Because some people will like my yoga and some people will like someone else’s yoga, and that’s okay. 

Let’s stick together yoga teachers; lift each other up and support each other.  After all, as long as we give our students good energy they can take out and share with the world, who cares if they get their good energy with instrumental music or the latest pop tunes.  

Namasté!